Migrating from nYNAB
To export your budget from YNAB, choose one of the methods below. Option A is the easiest for most users. If that tool is unavailable, Options B, C, and D provide alternatives.
Third-Party Web Tool
This is the easiest method available. Visit https://json-exporter-for-ynab.netlify.app, which guides you through authorizing your YNAB account and downloading your budget as a JSON file.
This tool is maintained by the community, not the Actual Budget team.
Once you have the JSON file, skip ahead to Import the JSON File.
If the json-exporter tool above does not work for any reason (it appears to be blocked by YNAB occasionally), you may try one of the following options.
Alternative Export Methods
Getting Your YNAB API Token
The alternative options all require a YNAB Personal Access Token. Follow these steps once, then use the token in whichever option you choose.
- Go to YNAB Developer Settings, sign in if needed.
- Under "Personal Access Tokens", click New Token.
- Enter your password and click Generate.
- Copy the full token shown at the top of the page. Do not copy the shorter, partially hidden version shown in the table below it.
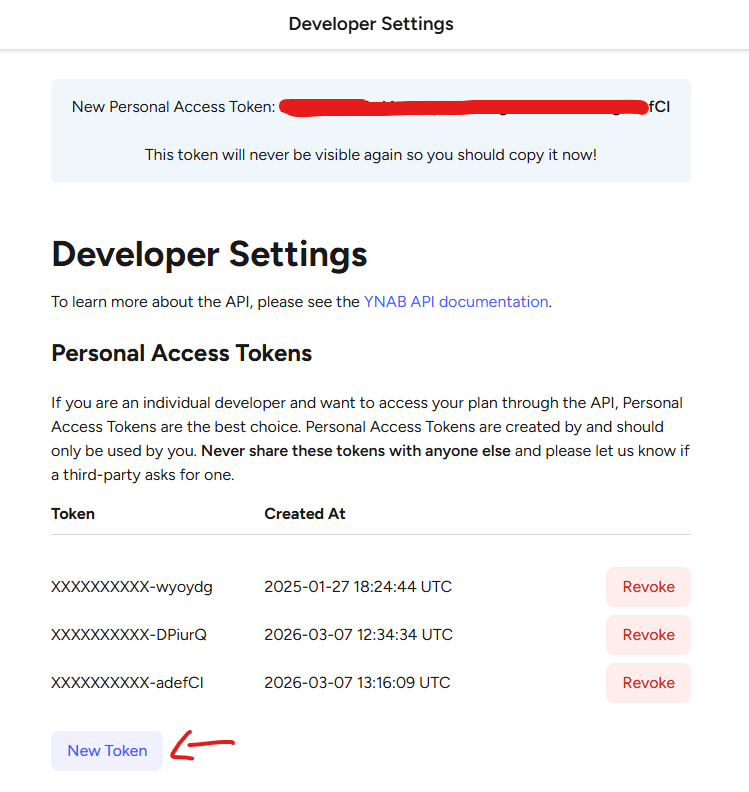
The token is only displayed once. Copy it to a safe place before closing the page. More information about the YNAB API can be found at api.ynab.com.
Options
- API Documentation UI
- CLI Tool
- cURL
This method uses YNAB's official API documentation website, which has a built-in interface for making API requests directly from your browser. No additional tools are required.
Before you start, get your YNAB API token if you have not already.
Step 1: Get Your Plan ID
- Open the Get All Plans endpoint in your browser
- Click Try it out, then click Execute (or "Test Request")

- In the Authorization field that appears, paste your API token into the Bearer Token box and click Send
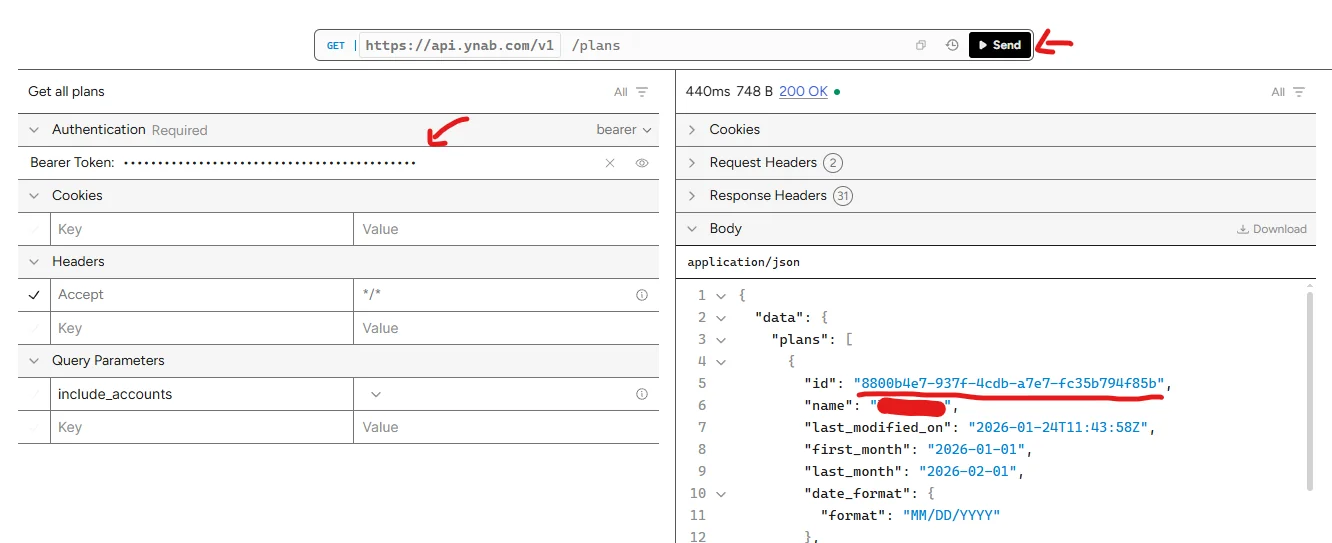
- In the response body, find the entry for your plan and copy its
idvalue (for example,8800b4e7-937f-4cdb-a7e7-fc35b794f85b)
Step 2: Download Your Plan
- Open the Get a Plan endpoint in your browser
- Click Try it out

- Paste your plan ID into the
plan_idfield and click Send - Once the response appears in the Body panel on the right, click Download to save the JSON file
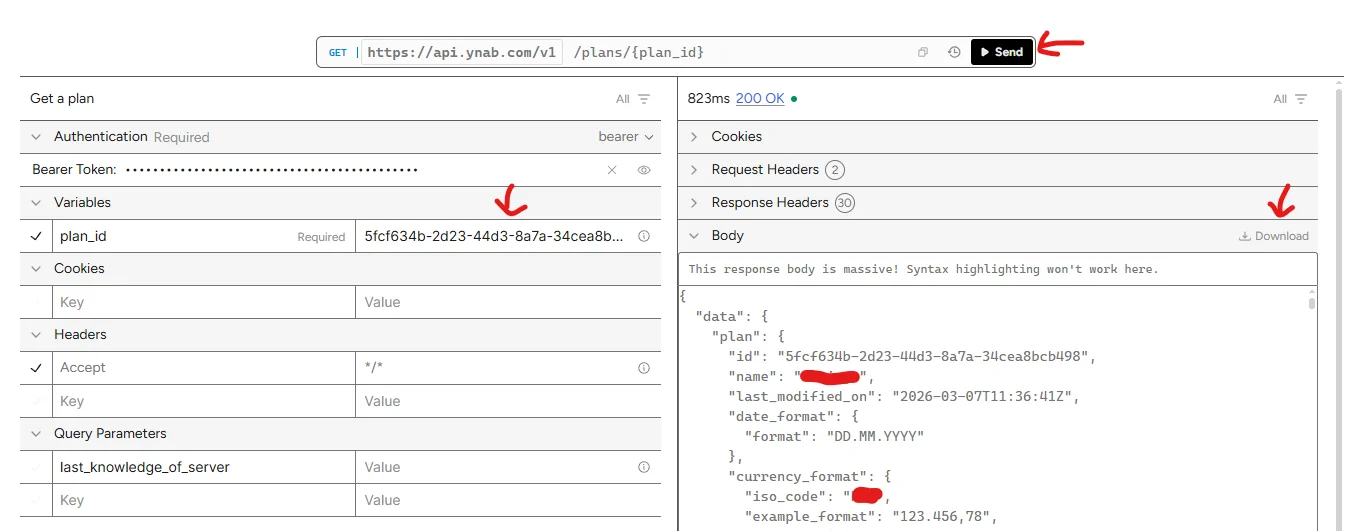
If the import later fails with a not-ynab5 error, you are likely on an older version of Actual. Either update Actual, or open the downloaded file in a plain text editor and change the leading "plan" to "budget" before importing.
The ynab-export tool is a terminal app that walks you through the export process step by step. It works on Windows, macOS, and Linux, and requires no installation beyond downloading a single file.
Before you start, get your YNAB API token if you have not already.
Step 1: Download the Tool
Go to the Releases page and download the file for your operating system:
| Operating System | File to download |
|---|---|
| Windows | ynab-export_*_windows_amd64.exe |
| macOS (Apple Silicon / M1, M2, M3) | ynab-export_*_darwin_arm64 |
| macOS (Intel) | ynab-export_*_darwin_amd64 |
| Linux (64-bit) | ynab-export_*_linux_amd64 |
The downloaded file is ready to run. No installation or extraction is needed. You may want to rename it to ynab-export.exe (Windows) or ynab-export (macOS/Linux) for simpler usage.
Step 2: Run the Tool
On Windows:
Open Command Prompt, PowerShell, or Windows Terminal. Navigate to the folder where you saved the file and run:
ynab-export.exe
Do not double-click the .exe file. It must be run from a terminal window to work correctly.
For the best experience, install Windows Terminal from the Microsoft Store (search "Windows Terminal" and click Get). Once installed, right-click in your Downloads folder and select Open in Terminal.
On macOS or Linux:
Open a terminal, navigate to the folder where you downloaded the file, and run:
chmod +x ynab-export
./ynab-export
If macOS shows a security warning, right-click the file, select Open, and click Open in the dialog. Alternatively, run the following command first:
xattr -d com.apple.quarantine ynab-export
Step 3: Follow the Prompts
The tool guides you through three steps:
- Enter your API token when prompted. The tool saves it automatically so you will not need to enter it again on future runs.
- Select your budget from the list of budgets in your YNAB account.
- Wait for the export to finish.
When done, your budget file is saved to your Downloads folder with a name like ynab-export-budget-name-YYYYMMDD-HHMMSS.json.
If you are comfortable with the command line, you can download your plan directly using curl.
Before you start, get your YNAB API token if you have not already.
Step 1: Get Your Plan ID
Open a terminal window and run the following, replacing <ACCESS_TOKEN> with the token you copied:
curl -H "Authorization: Bearer <ACCESS_TOKEN>" https://api.ynab.com/v1/plans
This returns a list of your plans. Find the id for the plan you want to export.
To format the output more readably, pipe it to jq (install with brew install jq on macOS):
curl -sH "Authorization: Bearer <ACCESS_TOKEN>" https://api.ynab.com/v1/plans | jq -r '.data.plans | sort_by(.last_modified_on) | reverse | .[] | "\(.name): \(.id)"'
If you see the error Invoke-WebRequest : Cannot bind parameter 'Headers' on Windows, use curl.exe instead of curl.
Step 2: Download Your Plan
curl -H "Authorization: Bearer <ACCESS_TOKEN>" https://api.ynab.com/v1/plans/<PLAN ID> --output plan.json
Replace <ACCESS_TOKEN> and <PLAN ID> with your values.
Once you have the JSON file, proceed to Import the JSON File.
Import the JSON File
-
Open Actual
-
Select the drop-down menu and Close File
-
Select Import file
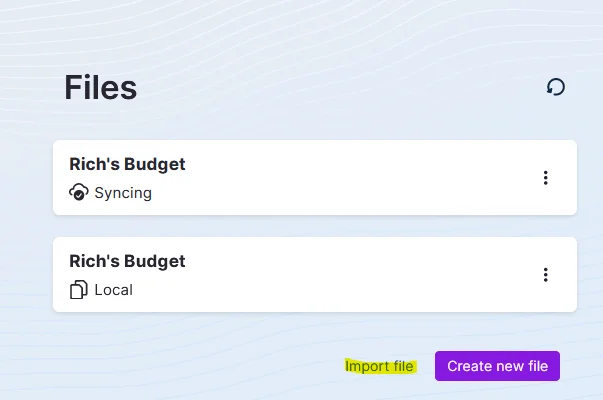
-
Select nYnab

-
Choose the exported JSON file
Cleanup
Credit Cards (Fix Overspending)
If you import credit cards with previous debt, you must handle these differently. Otherwise, your budget months will show overspending. Actual does not handle carrying over debt the same way, but offers a more manual approach.
- From the Budget screen, create a category named
Credit Card(perhaps under a Category Group ofDebt). - Change all overspent transactions to have their category be this
Credit Cardcategory. - On the first month of overspending for this category, click on the Balance (it should show red) and select
Rollover overspending. - Next, you must assign money each historical month to cover any payments of the
Credit Cardcategory. Open YNAB and look through each month to find the "extra" amount assigned to the card. (To find the "extra," open YNAB and look through each month. Find the amount assigned to the card in excess of any additional monthly spending, which is how much was used to pay the debt on the credit card.) Put this amount in yourCredit Cardcategory in Actual. - If your budget isn't zeroing out yet, follow the instructions below in Hold For Next Month.
A full description of how to carry over debt can be found in our Carrying Debt article.
Hold for Next Month (Fix Money Leftover in To Budget)
nYNAB calculates its Ready to Assign value differently than Actual's To Budget value.
There is no need to worry, we can make them match exactly with a simple change.
This is purely a visual change and doesn't affect the budget itself.
You will likely see money leftover in each of the imported months in your To Budget.
This extra comes from nYNAB including funds budgeted in future months when calculating its Ready to Assign value.
Actual does not include those funds by default, but offers a way to manually reserve funds for use in future months.
This is effectively the same thing nYNAB does, but in a manual form.
To hold the leftover funds for the next month follow these steps:
- Click on your
To Budgetvalue for the month. - Select
Hold for next month. - Fill in how much you would like to reserve for the future. By default the current
To Budgetvalue is filled in. Using this value will bring yourTo Budgetto zero. - Click
Hold. - Repeat for all desired months.
A full description of how funds rollover and the hold feature can be found in this article.
Duplicate Categories or Groups
Actual does not allow duplicate category groups, or duplicate categories within a group.
This happens sometimes in YNAB especially if you have an old hidden category or group that has been forgotten about.
Actual automatically renames these duplicates by appending a -1 to the end of the name (potentially higher numbers if you have multiple duplicates).
Make sure to show hidden categories to see if you have any of these duplicates.
To see your hidden categories select the "Toggle Hidden Categories" option in the kebab menu next to the "Categories" header.
To fix duplicate groups:
- Move any categories inside the duplicate group to a different group.
- Delete the duplicate group by selecting "Delete" in the menu next to the group name.
To fix duplicate categories:
- Find the duplicate category and select "Delete" in the menu next to the category name.
- Choose what category to move any transactions to that are part of this duplicate category.